Friday, November 27, 2015

DIY Secret Spy Kit

My Godson turned TEN the other day.  Ten.  Which is right down crazy, if you ask me.  I was thrilled when he mentioned that he would like a "spy kit" for his birthday.  What a fun gift for me, a one-time wannabe detective, to give!  It was rather funny that the cousins started this little detective phase after learning that Grandpa's bike and a case of beer had been stolen from the garage a few months back.  They spent the entirety of a family party searching for clues and coming up with various compelling theories on what had gone down.  ("Wait.  Aunt Bridget drinks beer..." "What if Grandpa hid the bike and now is trying to get the insurance money?"  "I saw some older boys down the street.  They were smoking.")  For several weeks after, they were trading theories and clues and searching for that bike.  

Anyway, after scouring the internet and stores for a cool ready made kit to buy, I came up empty.  Either they were pretty lame filled with a few plastic junky toys or they were oh, seventy dollars.  And we don't do seventy dollar birthday gifts 'round here.  So I decided that the boys and I would put together our own for him.  Total was around twenty dollars.


We bought almost all of our supplies at the dollar store...


The Basics:  Magnifying Glass, Flashlight, Notebook 
(I added the decals from stickers we already had and the pen from our massive collection that the husband brings home from work every. day.)


Disguise Gear:  Sunglasses, Hat, Mustaches
We already had those silly glasses and I threw them in just for fun.


Secret Code Kit and Invisible Ink
The plastic case came with the swabs.  I took out the cotton balls in the middle and replaced them with index cards on which I wrote a Morse Code cheat sheet and a reverse alphabet cheat sheet.  The invisible ink is lemon juice and I put it in a vitamin bottle I saved.


Fingerprint Kit:  The case is simply a plastic produce container I had saved from some cherries and had on hand in the cupboard.


Inside:  Fingerprint Dusting Powder (aka talcum powder), Makeup Brush, "Lifting Tape," Ink Pad, Homemade Print Cards (from normal index cards)


Other Gear:  Gloves (can't be leaving fingerprints behind!), "Lock Picking Kit" (screwdriver set with some bobby pins thrown in), Binoculars, Zip Ties (for securing the suspect, of course)


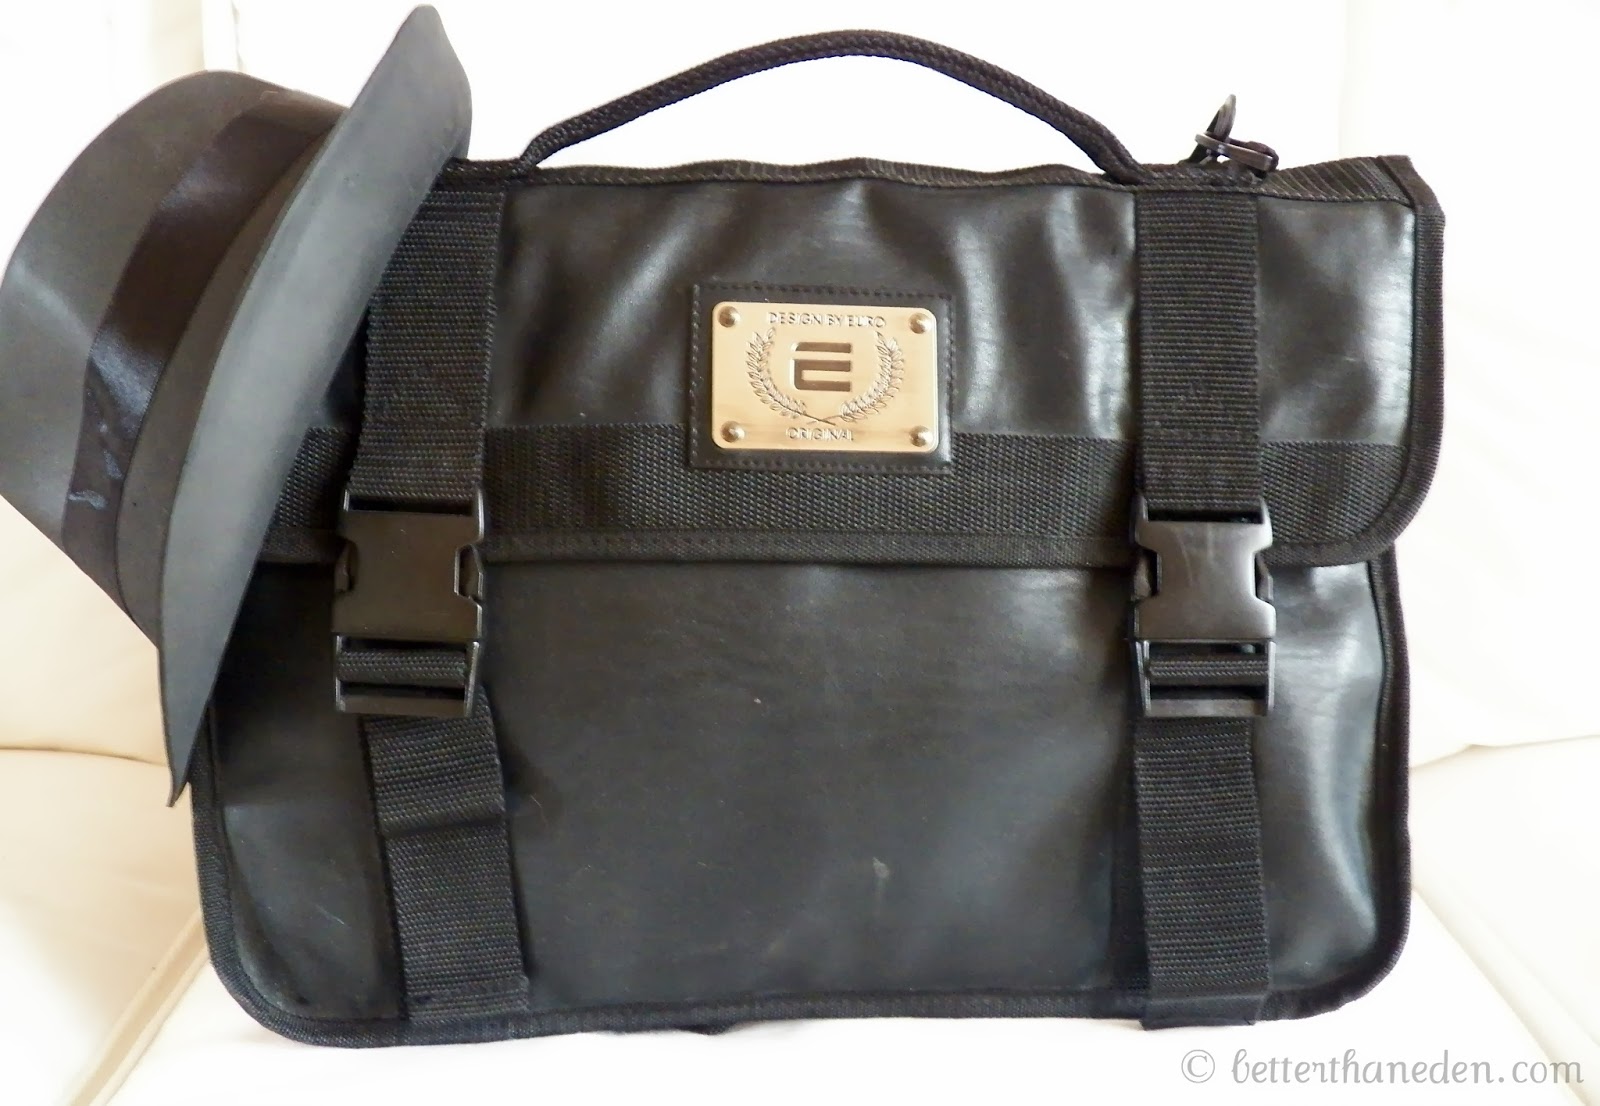
The only thing not from the dollar store or my own stash was the fancy briefcase which I scored at the Salvation Army for three dollars.  I was originally looking for a hard case in either black or silver but I actually think this works much better as it is filled with pockets and has three big dividers to help organize all the spy gear.  It's also much less conspicuous when he's going in cognito.  And if and when the spy phase is done, it's actually a really nice bag that can be used for something else.

We thought of a few other things that would've been cool to add  - walkie talkies, watch, wig, camera, spy glass - but we needed to rein it in a bit.  I suppose they could always be added in the future and of course, he could add any of his own things to it for his detecting adventures.

The boys decided that this was so cool that they also needed to make their own kits this week so they've been scrounging the house to replicate as much as they can of it.  John Paul especially is crazy excited to give his cousin his new kit and because I'm the most fun aunt in the entire world, we even made up a series of clues that will lead him to his present when we give it to him!  I'm really hoping he enjoys it!

The Chicken Coop – Final

Welcome back to the final posting for the Chicken Coop project. I know it has been a while since I have updated my blog on the Chicken Coop progress but I have it all here now and I think you will be happy.
When last we met I had finished the tar paper around the entire coop helping to reduce water/rain/moisture etc. from getting inside. Now we move to finishing the outside.
In this picture I have completed the shingles on all four sides. After a brief design session with my Dad, I decided to add white moulding on the vertical corners of the coop that you will see later.
We do intend to paint the shingles so don’t think you are seeing anything close to the finished product yet.
After returning from a week long cruise to Alaska with Jess’s family, we found our birds considerably larger than we left them and definitely too big for the box in the garage they were living in.
I decided to expedite the interior of the coop so we could move them in as soon as possible. The first step was to line the bottom with marmoleum, which is basically a non-toxic version of vinyl. This essentially created a waterproof “bath tub” which will allow us to hose it out every few months for a full cleaning.
I built these laddered perches to give them some options for their sleeping arrangements. I have added the wood shavings and have their new water and food containers all ready to go. Time to move them in!
Back to the exterior. We finished painting the front wall so my daughter and I installed the chicken door to get an idea how it will look with all the different colors.
I added the moulding around the corrugated roof of the nests. This is designed to be lifted up whenever we want to check for or gather eggs so we don’t have to actually send Abby into the coop for them.
The metal corrugated roof is very sharp (I won’t post a picture of my scar) so I knew I wanted to cover the edge. This way allows water to still drain under the moulding and run off to the ground. I will be doing the same thing with the roof line as those corners are right at my eye level.
Time to work on the accessories. I have eight windows that each need two shutters. Using a template on my miter saw and my air compressor and nail gun, I was able to put these together in no time.
To begin with, the shutters will not be functional because the hinges we wanted would have cost us about $150 for all the windows. Eventually I may convert them over but for now the hinges will be decorative and on the front wall only.
It’s time to think about the chicken run, the enclosed “yard” I have planned attached to the coop. And what does every respectable yard need? A white picket fence, of course.
My father-in-law “procured” some pallets which he made quick work of with his circular saw. I ran the boards through my table saw at 3″ to get them all the same width, squared off one end with my miter saw, cut them all to 15″, then gave each a couple quick 45 degree cuts for the fence board look. Then I got to paint them all.
Here are 69 boards total which were in the original design. A last minute design change reduced the amount needed to about 45 and looks much better.
Tada! And there you have it in all it’s glory. This gorgeous chicken coop has lots of natural light, brand new wood shaving flooring, beautiful black metal accessories, is close to several bus routes and in a great school district.
As good as my iPhone camera is, I decided to bring in a professional photographer for the finished product pictures. Thank you to Jessica Peterson at One Tree Photography.
From this angle you see the front and nest sides, and the chicken door and ramp down into the run
This is from the other side where you see the larger “living room” window and people door. When I say people I mean Abby or Wally. I’m not getting in there.
And don’t ask me where Jess found the black metal star flower holder but it is perfect.
A closeup of the fine craftsmanship and design.
Hey Wallyman, what do you see through the fence?
Oh.

The Chicken Coop, Part IV

Part 1
Part 2
Part 3

As the time for the chickens to move into thier coop draws closer I am beginning to get a little nervous about finishing everything. I now have a master list of everything that needs to be done to finish so I don’t forget something at the last minute.
A couple weekends ago I was able to finish putting up all the exterior plywood and begin the tar paper. This thing will definitely be water proof.
Once I had a little more free time it didn’t take long to finish the tar paper all around. This is where I start to get a little excited (ok, more excited) because I am almost ready to add the exterior finishing which will give you an idea what the finished product will look like.
The first step of the exterior was to build, paint, and install the moulding around the windows and doors. I found 10 free minutes this morning to put them up with the help of my trusty nail gun and air compressor. I can’t let a little rain stop me from getting some work done on it.


                                                                      Part V (Final)

The Chicken Coop, Part III

After strengthening the entire framework with screws at every joint, it is now time to begin the exterior. There are several steps involved but the first is to cover the windows with this 1/2″x1/2″ hardware cloth.
Before I installed the hardware cloth, I cut a 4’x4′ piece of plywood for the exterior, clamped it in place, then used a pencil to trace the windows and the chicken door. I now know exactly where to cut with my jigsaw. Using my staple gun and air compresser I secured pieces of hardware cloth over each window.
Back in my shop I drilled a starter hole for my jigsaw then cut out the openings for both windows and the door. After that, it was a simple matter of positioning the plywood again and screwing it on.
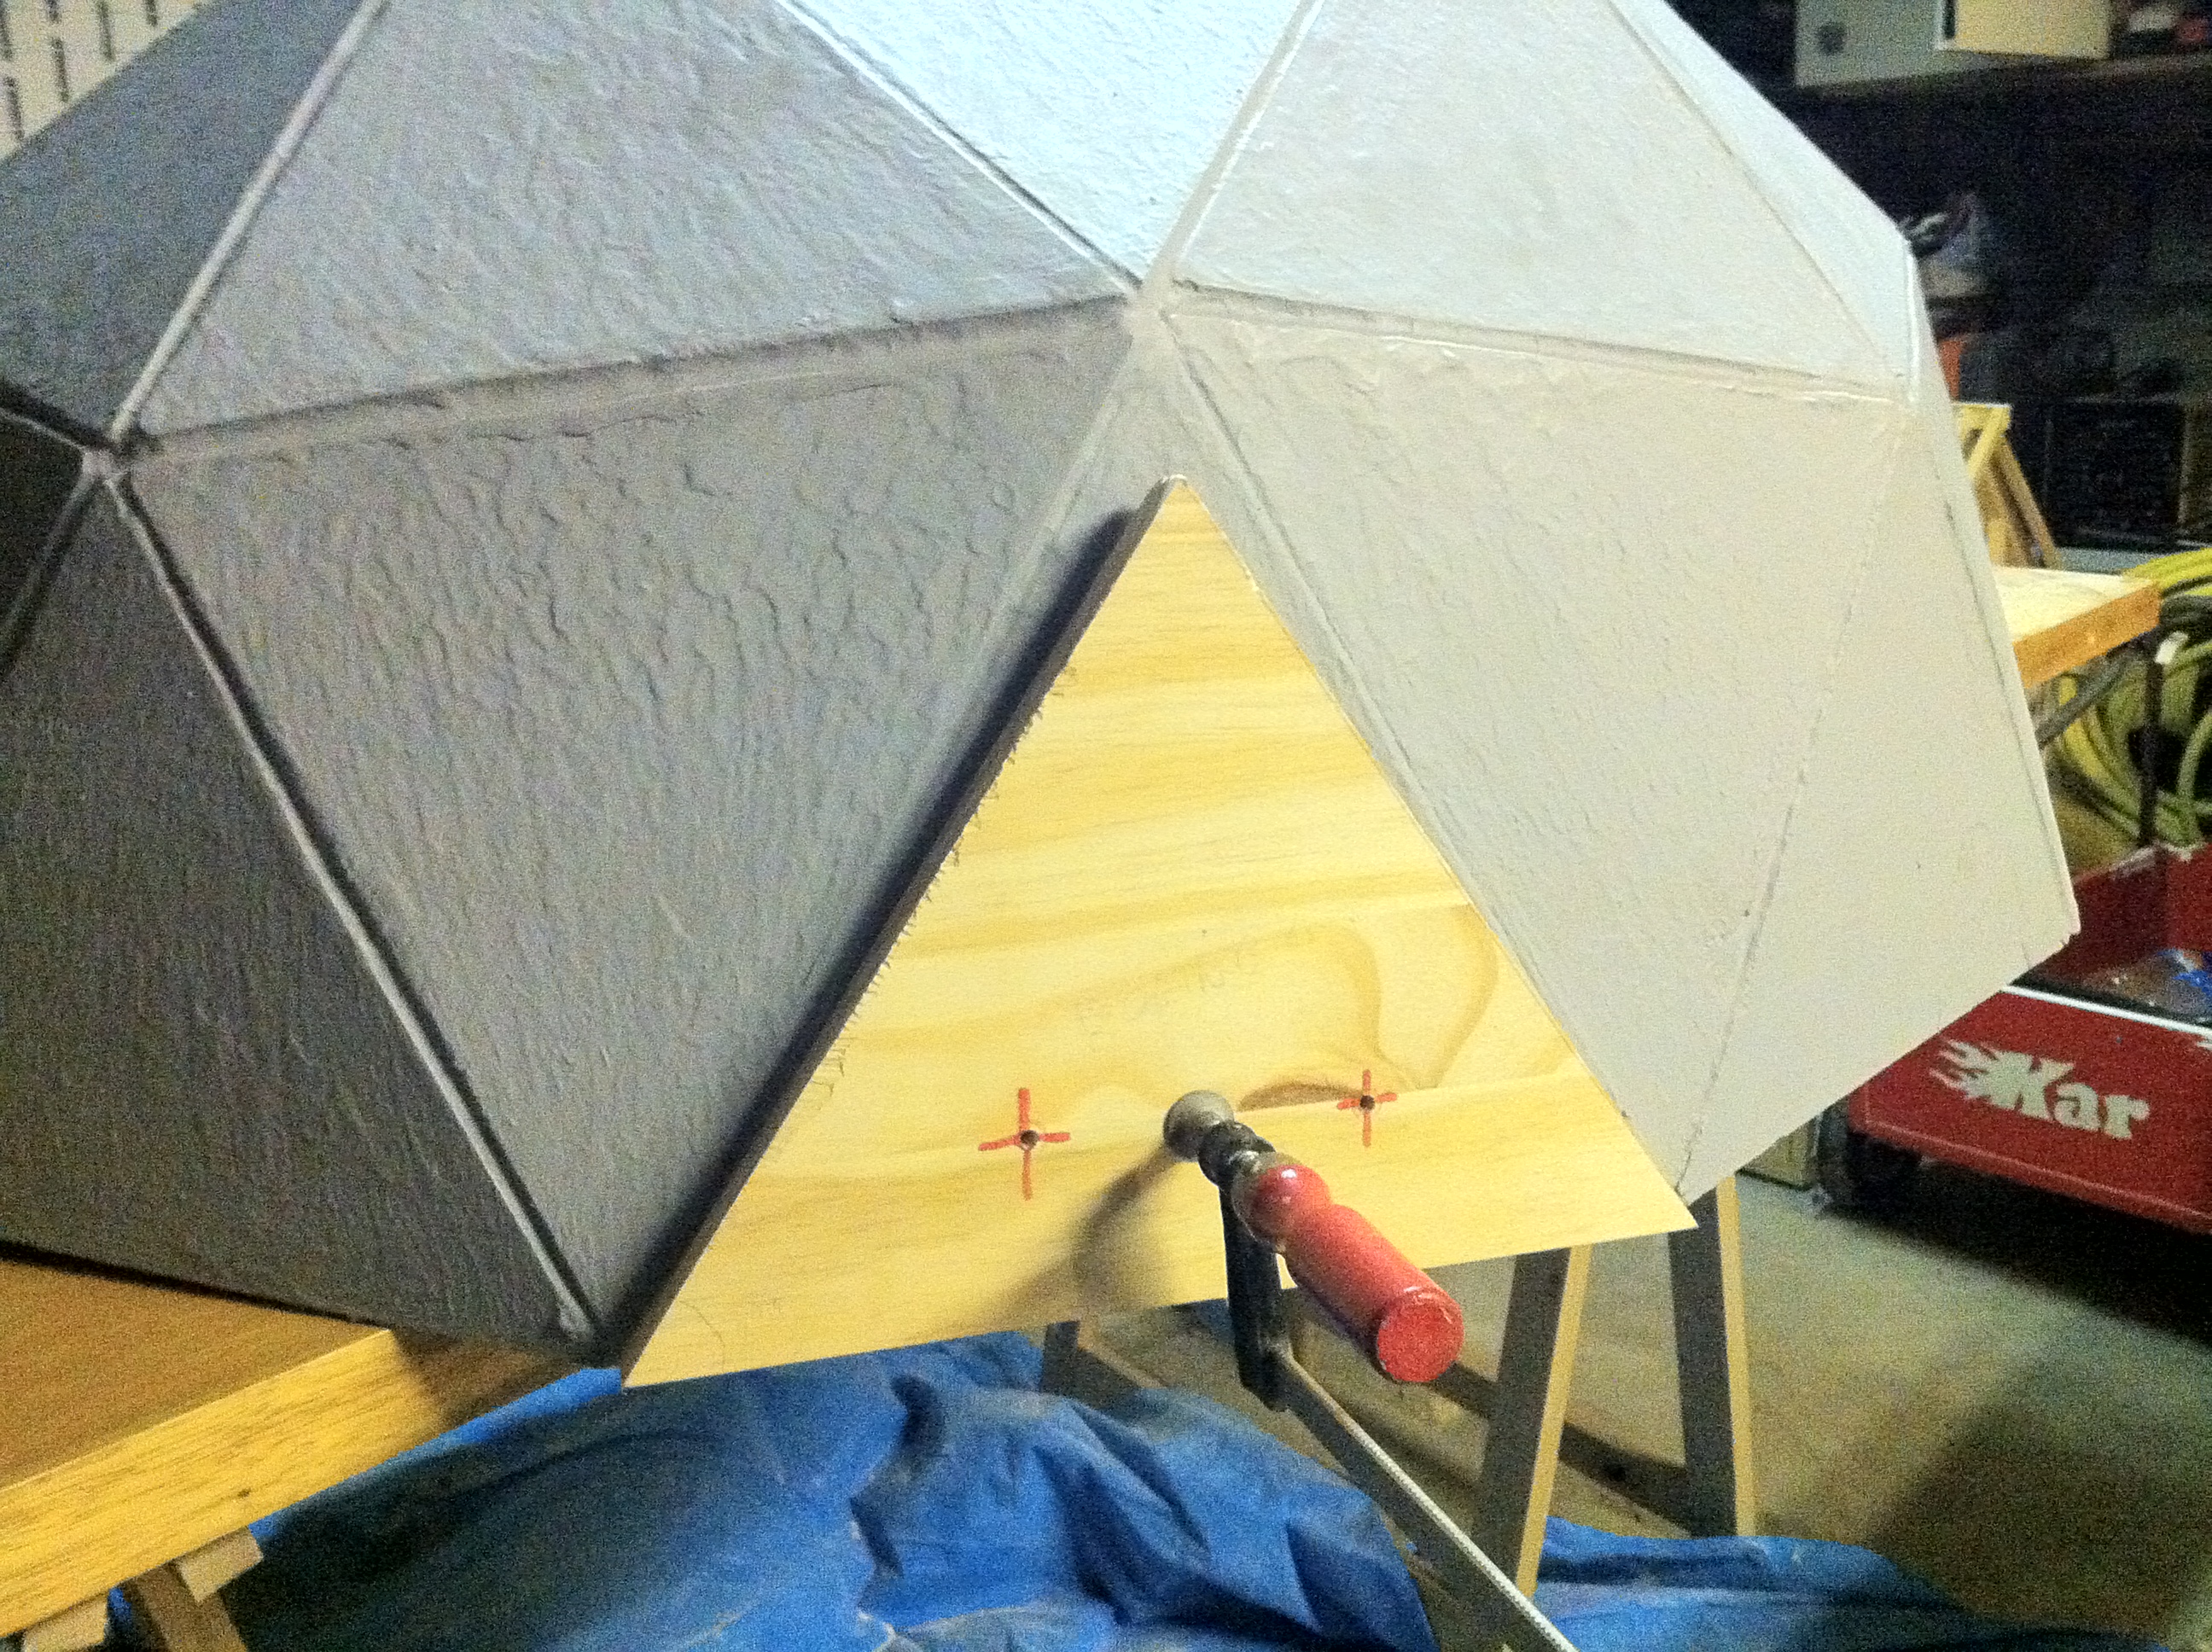
 The back wall uses the other half of the sheet of plywood. (Amazing how that worked out so perfectly, isn’t it?) There is no chicken door but this side is a little more complicated because I want the bottom half of the wall to hinge up giving us access to easily rake out the chicken…stuff.
I used the same technique, clamped the plywood, traced the windows, removed the plywood, added the hardware cloth. But then I cut the plywood in half. Installing the upper half was easy. I simply positioned it and screwed it in. The bottom half I clamped on again where I wanted it, then installed the hinges.
Here the bottom half is attached. I will eventually add some clasps at the bottom to secure it down, but they will go on after the bottom trim. Notice that I added the hinges before the shingles. I’m hoping I can notch the shingles in such a way that the hinges will rotate freely, but the plates of the hingles will be hidden. I’m either brilliant or this is going to cause me a lot of trouble later.
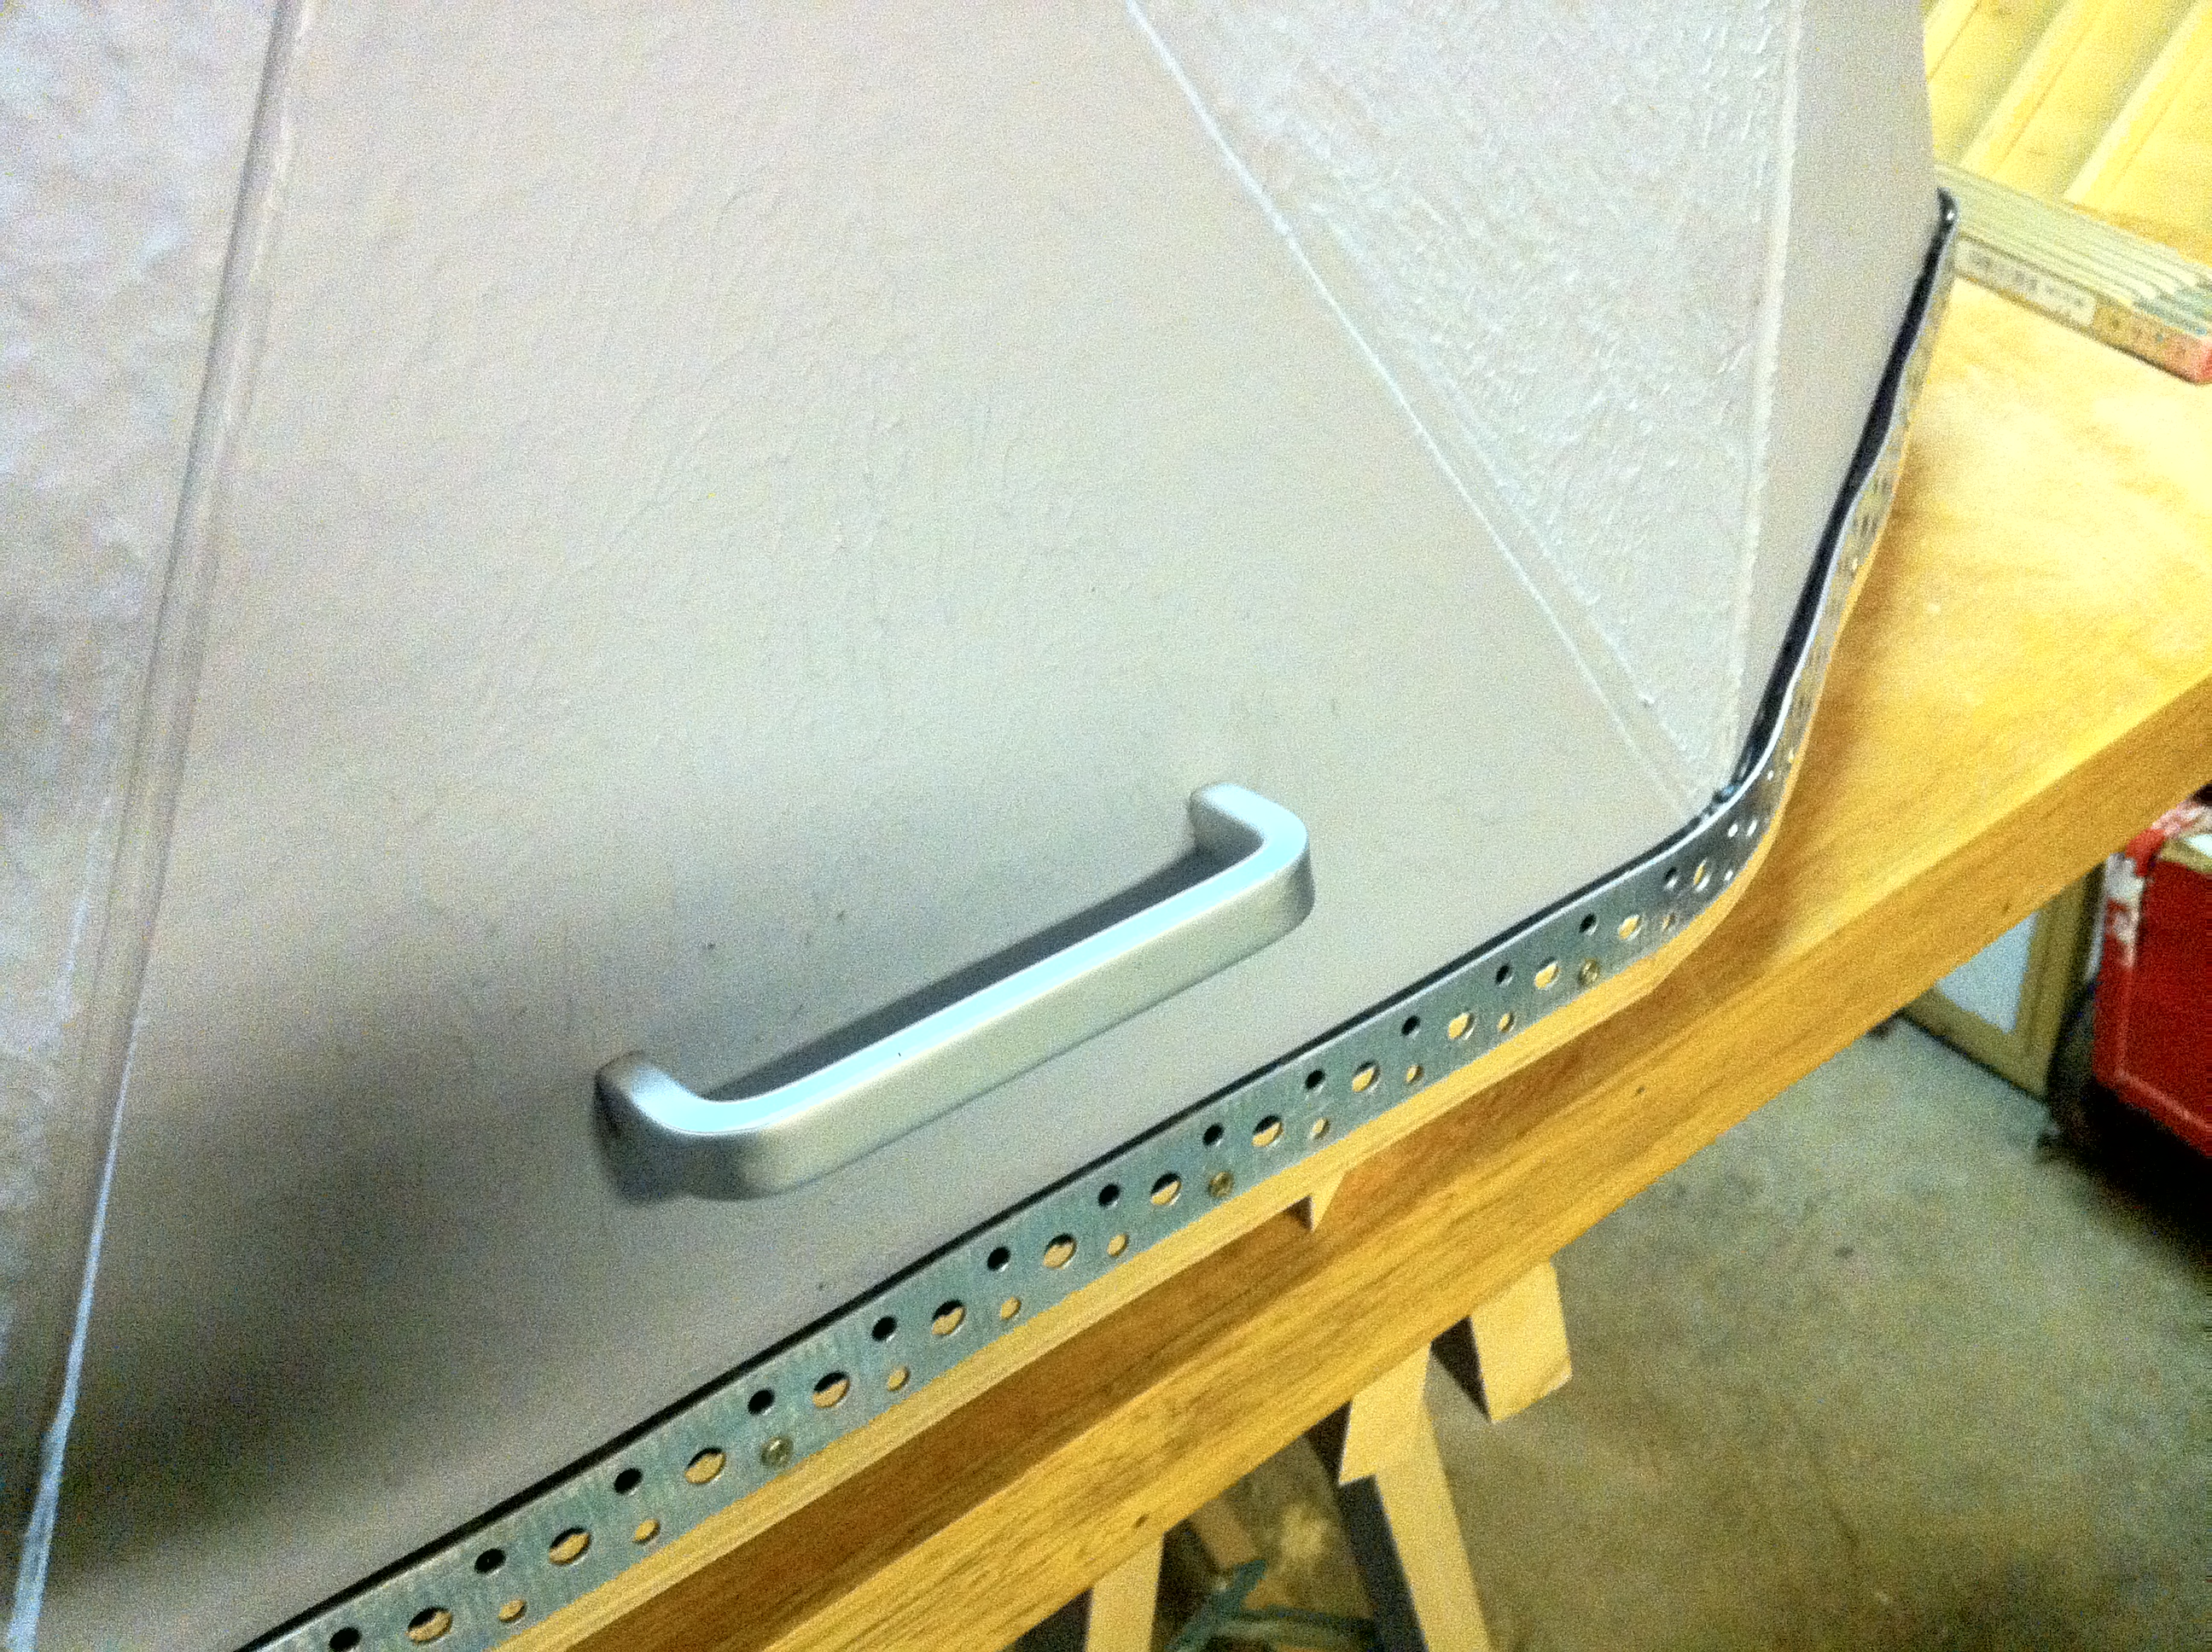
 Jess was out running errands with Wally and Abby was napping so I figured I would keep going and do as much as I could. I cut another sheet of plywood to a little over 6′ for the “front” of the coop, clamped it up, traced the window and human door, and installed the hardware cloth. Right as I was about to cut the opening out, Jess came home WITH OUR CHICKS!
We have them all set up in our dining room with a heat lamp, food, and water. The black one is mine, Teri (short for Teriyaki). The yellow one is Abby’s, Chip (short for Chipotle, Abby picked the name herself). And the grayish blue one is Jess’s, Ina (as in Ina Garten). It will probably be about 8 weeks before they are big enough to transfer to the coop which gives me a lot of time but also gives me a deadline. Wish me luck and check back soon for the next update!

Part 4

The Chicken Coop, Part II

Part 1

Fortunately, we had another weekend day with great weather so we packed the kids up in the truck and headed to Home Depot (with a quick stop at Starbucks and Costco first) to pick up some materials for this phase. We began by framing in the back wall. It has two windows to match the front.
We will be using the Deep Litter method for our coop which basically involves about 5 inches of mulch in the bottom of the coop. Every other day or so we will just rake it quick which will hide the chicken poop fertilizer and its smell. Then once every few months we will rake it all out and replace it with new mulch. Meanwhile, the old stuff is perfect for using in our garden, planters, etc.
You may have noticed there is no base plate on this wall. The bottom half of this wall will be on hinges allowing us to lift it up to simply rake everything out into a wheel barrow.
Here is my dedicated helper making sure the wall doesn’t fall down.
The last wall was tricky because it involved the nests. I got all the pieces cut out and put almost the whole wall together in my shop then transferred it to the coop. The nail gun made quick work of getting it into place. Later I will go back with screws all over the place to solidify the whole structure.
The nests are external and will eventually have a roof matching the coop roof that hinges up allowing us to collect eggs without entering the coop itself. The far section will be enclosed and used for storage. They say to allow one nest for every 2-3 hens. We will have three nest so definitely room for expansion of our flock if it becomes legal.
Jess took offf for a photo shoot but I was fortunate enough to have my inlaws volunteer to help. Jess’s mom watched the kids while her Dad and I made quick work of constructing the trusses for the roof. A little geometry and they went together very quickly.
After that it seem like things just started going our way. It turns out with two people cutting and 8 foot by 4 foot sheet of plywood it is a lot easier. We cut the roofing and installed them, layered some tar paper over that, then added the corrugated roofing Jess picked out. This thing will definitely be water proof.
We had to keep reminding ourselves we are only building a chicken coop as we caught ourselves trying to fix things that were a sixteenth of an inch off. I think it is coming along nicely, don’t you?
 Stay tuned for Phase III when we look at shingling the sides and finishing off the nests.

Part 3

The Chicken Coop, Part 1

As excited as any of us, Abigail helped me build the base. The floor of the coop will be raised about 20 inches both to deter predators and to give the chickens a shady place during warm weather. I am trying to keep the coop as light (it will be mobile) and cost effective as possible. However since Jess and Abby will from time to time be cleaning out the coop, I wanted a fairly strong floor.
After installing the 5/8 plywood flooring we moved it outside to it’s initial position. I will be building the remainder of the coop from here. This is as far as I meant to get today but it is time for Abby’s nap and I think I will take advantage of the nice weather to get as much done as I can.
I framed the front wall with my nail gun and reinforced it later with some exterior wood screws. It might be a little hard to envision here but this wall has the chicken’s door (center bottom) which will have a ramp down into the run eventually. Near the top are two square windows. Ventilation is a huge issue with chicken coops for cooling the temperature down, drying it out to prevent molding, even extra light which is important for egg production.
Since things were going to quickly, I put the right wall together and got it installed. This wall has the larger door for Jess and Abby to enter if they need to clean the coop, as well as a larger window.
Check back soon as I will be updating as the project progresses. The next phase will be the last two walls including the nests, tricky but really cool.

Part 2

Geodesic dome chicken house

I constructed a 2V geodesic dome to serve as my chicken house. The dome has a diameter of about 1 meter and is about 50cm high. The triangular entrance is about 30cm on each side. Below are some of the details explaining the construction of my dome.

Why?

So you may wonder why I built a geodesic dome. Well, obviously, geodesic domes are awesome and inspiring structures. There's quite a few advantages to the structure that make it very suitable for some of my personal requirements for a chicken house.
Maximizes volume per surface ratio: Well, the optimal would be a perfect sphere, but this is very, very close. The inside of the dome is very spacious (the floor is about 1.5 square meters, good for about 3 to 4 chickens) and the amount of paneling needed is very limited (just over 3 square meters) and thus cheap to make. As an extra, if it's really cold, the chicken's warmth will be better preserved than a box-shaped chicken house. Not that chickens care about saving on heating.
Superior weight to strength ratio: A geodesic dome, by design, perfectly balances forces of compression (forces causing material to be squeezed) and tension (stress that pulls material apart). I can easily stand on the dome without it moving a millimeter but still easily lift the whole dome single handedly.
Does not require a primary support structure The construction of a geodesic dome does not require a frame to support the dome, which saves on space and materials required to build the dome.
The chicken house as a few extra features. The house is raised about 40cm from the ground so the house is safe from any moisture creeping up from the ground. Chickens like to be out of the rain when it's pouring and this height provides them with a dry place to sit. As another feature, the whole dome sits loosely on top of the table-like floor. I can easily lift the dome on either side to collect eggs, or simply remove the whole dome from the floor in order to clean the inside of the chicken house. Having had many chickens and various chicken houses, I believe that the dome is superior to most other chicken houses for these tasks.
It is the pervading law of all things organic and inorganic,
Of all things physical and metaphysical,
Of all things human and all things super-human,
Of all true manifestations of the head,
Of the heart, of the soul,
That the life is recognizable in its expression,
That form ever follows function. This is the law.
-- Louis Sullivan

Dome construction

I started of with some wooden boards, some metal plumber's strap and screws.
First job is to cut out a whole bunch of triangles from the wooden boards. For the geodesic dome I wanted to make, I needed 30 isosceles triangles of one size and 9 equilateral triangles.
Kept on cutting triangles until my garage was full of triangles ...
I cut out short pieces of the strapping to produce parts that can join the triangles together (I needed more than 100 of these ...).
First, I used up all isosceles triangles to make 6 pentagons.
Then, I started using the equilateral triangles to join these pentagons together. Below is the pentagon that will become the top of the dome, with 5 equilateral triangles attached.
With this top, I started adding more pentagons to the construction ...
until all pentagons were combined into a dome with some "entrances" which needed to be filled, except for one.
Here's a peek into my garage while working on the dome.
The entrance was locked into place with a "step," an extra piece of wood to make the construction as sturdy as possible.

Making the dome water tight.

Now that the construction of the dome was finished, I needed to protect it for the harsh outdoors it's going to spend in. Here's some of the products I used.
  • (Insect repelling) saturator (makes sure all pores are stuffed and no water can enter the wood, at the same time make sure no insects can eat up my wood)
  • Silicones to make the joints water tight
  • Roof rubber to cover the whole dome and make it water repellant (this rubber is used to fix leaks in roofs and at the same time reflects most of the sunlight so it doesn't get all too warm in the dome)
First, I soaked the wood with saturator.
Then, I filled all joints with silicones
I prepared the dome for painting with rubber.

Dome floor

Using "betonplex" (an outdoor triplex used to make formwork to pour concrete, very sturdy, and easy to clean when it's full of chicken shit). I traced the form of the dome, cut it out and used plumber's strapping to make an edge around the flooring so the dome can fit on top of the floor.

Handles

The dome is supposed to sit loosely on top of the floor and by lifting it up I can collect eggs or clean the inside of the house. In order to lift the dome, I needed some handles. Here's the jig I used to drill holes for the handles.

Installation

I used a few wooden outdoor poles to raise the whole dome about 40cm from the ground and made a simple wooden step so the chickens can get into their house. Here's all the parts, ready for installation.

End result

And as such, I created my own nonconventional geodesic dome chicken house!
My chickens quickly figured out how to get into the house (they'd never seen a house with a ladder) and already on the first day, I could collect yummie eggs from the new chicken house. It seems like it works!

Open problems

  • One problem of the current design may be ventilation. If the dome gets too hot in the summer, I'll install a small ventilation vent in one of the top triangles of the dome.
  • Also, I'm not sure if the current floor design will keep rain out of the house, or whether it'll seep in. One idea is to drill holes in the floor to dry the inside.
  • Some commenters mentioned that it's not fox safe, but since there's no foxes in our neighborhood I don't need to protect my chickens from them. A triangular door could easily be made to close the dome for the night or the ladder could be made fox-safe.
  • Some commenters said this shouldn't be considered a hack, because then gazebos are hacks too. OK, I did not hack a coyote proximity sensor into an existing chicken house, so I didn't hack a chicken house. Then again, it's geodesic and geodesics rule.